 Over 5 Million Locks Sold
 Trusted Since 2003
 Help
HelpYour Cart is Empty


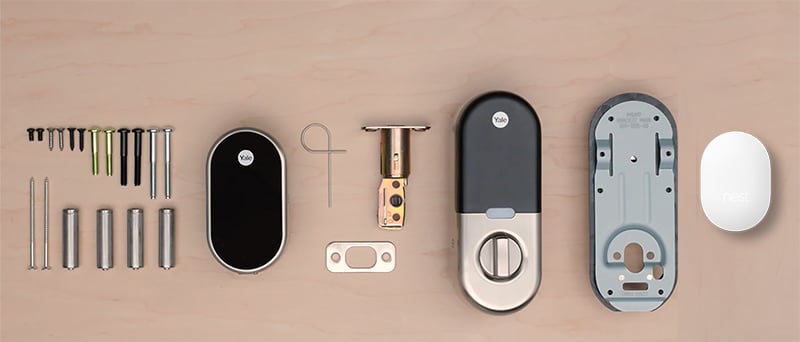

Yale brings decades of lock manufacturing. Nest brings years of home convenience and automation. Together, they’ve created a sleek smart lock packed with features, including family codes, timed codes, auto-locking, tamper alerts and much more.
The Yale x Nest lock is a tamper‑proof, key‑free deadbolt that connects to the Nest app through the Nest Connect bridge. Now you have the convenience of accessing your door from anywhere. Lock and check your door status with your voice using the Google Assistant. It will let you know about each person who came through your door. Whether alone or part of your existing Nest family, this smart lock is ready to provide superior security and peace of mind.
While relatively straightforward, you may run into a stumbling block or two while configuring your new lock. Use our guide below for best practice advice and tips during installation.
Test that your lock works with the door both open and closed. With the door open, turn the thumb turn and make sure the bolt fully extends. Then, turn the thumb turn so the bolt is retracted. With the door closed,Turn the thumb turn to lock the door. If you feel resistance, or the bolt doesn’t extend fully, remove the lock and re-check the deadbolt and lock installation.
Important: Close the door but leave it unlockedwhile you install the batteries. If it isn’t, your lock will not be able to test and calibrate itself to your door correctly. Insert the included AA batteries into the battery compartment. The lock will turn on and you’ll hear the Nest greeting.
Don’t put the battery cover on yet. You’ll need to scan the code in the battery compartment to connect to the Nest app. Note: If your lock fails the calibration test, reset it to defaults, and follow the steps for creating a master passcode and connecting it to the app again.
You’ll need to create a temporary master passcode on the lock before you can connect your lock to the Nest app. Once you’ve connected your lock to the app, you won’t need the master passcode anymore. Touch your palm to the keypad or press the Yale logo to wake up your lock. The lock will tell you what to do. The lock will ask you to close the door so it can calibrate itself. If the lock detects an issue (such as a jam) it will automatically unlock.
If you’re new to Nest: Go to the Apple App Store (iPhone) or Google Play (Android) to download the Nest app and create a free account. If you already own a Nest product: Sign into your account on the app, if you aren’t already. Note: If you have more than one home in your account, make sure that you’ve first selected the Nest home where you want to install your lock. Tap Menu icon in the top left of the home screen to change homes.
The Nest × Yale lock doesn’t directly connect to the internet. It needs to connect through either Nest Guard or Connect. You must have one of these already connected to the Nest app to add the Nest × Yale lock. If you don’t, use the Nest app to set either of them up. Then you can continue with setting up your lock.
New Nest Users: Tap Add New on the app home screen. Already have a Nest product:Tap Settings in the top right corner of the app home screen. Then select Add product.The app will ask you to scan the QR code on your product so it knows what you’re installing. The Nest × Yale Lock code is in the battery compartment. Once the app knows what you’re installing, it will guide you through all the steps. Tip:If you’re having trouble scanning the code, make sure you have good lighting and that you’re not casting a shadow on the code. Start with your phone about a foot away and slowly move it closer to the code. It doesn’t need to fill the box in the app to scan. If you still can’t scan the code, tap Continue Without Scanning and type in the numbers at the top of the QR code.
Tell the app where your lock is installed. The app will use this location when it sends you notifications, so pick one that makes sense. The app will start looking for another Nest product that your lock can connect to (either a Guard or Connect). When it’s found one, press and hold the white button above the thumb turn on your lock to connect them. Troubleshooting tip:If your lock can’t connect, try moving your Guard or Connect closer to your lock. Even a few inches or a couple of feet can make a big difference.
Next, you‘ll create a Nest passcode with the app. This passcode will replace the master passcode you created on the lock. The app will then ask if you want to create passcodes for other people who share access to your Nest home. You can also invite new people to share access, and you can set a schedule that limits when a person can enter your home.
Need help with the installation? Visit our Home Automation and Setup Service page to schedule your session.